Island Help

Poptropica is filled with a variety of islands, each one unique with its own stories, characters, and plot. Your job is to help the citizens of each island solve their problems, and you will be rewarded along the way! This page lists all of our (and Poptropica’s) island help resources available. Plus all the guides of all islands will be written in this page :P I know its like some how hard but try to read it :)
_____________________________________________________________________________________________
24 Carrot Island Guide
First, go to 24 Carrot Island (if you are not already on it). You should be on Main Street (if you’re not sure where you are, check your Map). Move to the right and enter a building labeled “Charlie’s Carrot Surplus Co.”
Once inside, move to the right and talk to the person you see. If you ask her who she is, she will introduce herself as Charlie. Ask her, “Feeling down?” She will tell you that she lost her cat,Whiskers, and that if you can find her, she will give you a crowbar for free!
Finding Whiskers the cat
To find Whiskers, Charlie’s cat, first leave Charlie’s store. Go left where you will see a sign that says “Carrot Farm.” Click on the sign to go there. Now, go left again and you will be at the Carrot Farm. Move a little to the left, and you should see a house with a door blocked with wooden planks.
Jump up on the ledge near one of the house’s windows, then up again onto the blue roof. On the roof, jump near the chimney, and click on the chimney to enter it. Now you are inside the house. Move to the right, where you will see a white Empty Bowl lying on the ground. Walk over to it to pick it up.

Now leave the house by moving to the left and exiting by the red fireplace (which leads to the chimney you entered from a while ago). Exit the Carrot Farm.
Back on Main Street, go inside the building labeled “Carrot King Diner.” Move to the left, and talk to the lady with blonde hair holding a pitcher of milk. Ask her to help you fill your bowl with milk. The empty bowl will become a Bowl of Milk.

Now go back to the Carrot Farm, and go inside the house where you found the milk again. There, you automatically will set the bowl down where you’d found it.
Go all the way to the right, and climb up to the second floor by climbing up the black rope holding the light. On the second floor, go all the way to the left, until you reach the bath tub on the very left. Turn on one of the faucets, and Whiskers the cat will jump out of the bath. Now, herd (chase) the cat down to the bowl of milk which you set on the ground.
Chasing the cat down is a bit hard, but don’t give up! Once the cat drinks the milk, it will follow you. Slowly, guide the cat back to Charlie’s store.

Return Whiskers to Charlie, and Charlie will give you a Crowbar.
Going inside the Factory
Go back to Main Street. Move all the way to the right until you see a sign that says, “Factory.” Click on the sign to go to the factory. Go right again, and you should appear outside the carrot factory. Climb onto the roof of the factory, where you should see a blue scroll sticking out of the top window. Jump to it and grab the Vent Blueprint!

Now jump down, and you should see some red cans with a white skull on them. Jump on one of them, and near it should be a huge brownish-green pipe. Click on it to use your crowbar and pry open the pipe. You can now enter the factory! Click on the pipe again to enter it.
The Factory
You should now be in the sewer of the factory. Move left and grab the colorful carrot device lying on the ground. You should acquire a Carrot Transporter. You can use it to transport yourself outside the factory.

Above you should be a small ledge, jump on it. Now jump onto the platform to your right. Go across the red trapdoors, and avoid falling down. If you do, don’t worry, just try again. Avoid the big brown rat by using the extra pipe above you. At the end of the pipe, go up.
The Master Engine Room
You should have arrived in the master engine room. Pull the green master engine’s middle lever down all the way, and pull the other levers only halfway. Now, climb up to a platform with a pyramid of barrels and a stack of boxes. Jump onto the stack of boxes, then wait untl the claw comes around. When it arrives, jump onto the claw, but then jump onto the top. If you stay on the bottom you can fall through its hole, so be careful. Ride the claw all the way to the far right platform. There should be a vent, enter the vent.
Vent System
You are now in the vent system. Use the blueprint to help guide you to the Processing Room. Here’s the full picture of the vent system schematic blueprint, courtesy of the Poptropica Wiki:

Along the way, you should find some Wire Cutters. Pick them up.

Then continue working your way to the Processing Room. Jump to the ground. Wait for the security system to automatically transport you to the Freezer.
The Freezer
You should now be in the Freezer. (Remember, if you’re not sure where you are, check your Blueprints.) Click a small metal box on the wall labeled, “Security System”. Use the wire cutters to cut the all the wires. Climb up to a high platform to enter the vent system again. Use the blueprints to help you return to the Processing Room.
Processing Room
Now you’re back in the Processing Room. Talk to all the mind-controlled people (choose the third option in the chat) to distact them so that you can press the power button in the middle of their rabbot ears. The mind-controlled people will now be free! Now, go over and click the big metal doors. You will fall down in a trap and land into the Smelter Room.
Smelter Room
You should now be in the Smelter Room. Jump down the red platform to land on a conveyor belt. Move to the far right end of the conveyor belt and jump up onto the pipe. Now jump on top of the machine and grab the rabbot Drone Ears.

Go to your inventory and put them on. Scroll over the word “Exit” on the pipe and click. You should be brought back into the Processing Room.
Printer Room
Now go back to the vent system and get to the Printer Room. At the Printer Room, make sure you avoid the falling crates, because they will knock you over if you bump into them! Now disable the mind-controlled drone near the printer by talking to her and pressing the power button in the middle of her rabbot ears. She will give you a printout with the System Password on it – “fuzzybunny.” Grab the paper and make your way back into the Proccessing Room.
Processing Room
Make sure to have your rabbot drone ears on! When you do, go back over to the big metal doors and click on them. You should now be in the Rabbot Room.
Rabbot Room
Talk to Dr. Hare. Climb onto the giant rabbot and go to the right platform. Disable the mind-controlled drone there. Click on the computer to use it. Enter the password as “fuzzybunny”. Next, enter “launch rabbot.” It’s time to stop the evil Dr. Hare!
Steer the rabbot into four meteors. When the rabbot hits the fourth meteor, it will be destroyed and Dr. Hare’s plan will be foiled! Now go to your inventory and use the “Carrot Transporter” to take you out of the carrot factory.
Claiming Your Reward
Now for your reward. Go back to Main Street and go all the way to the left side where you should see the mayor. He is wearing a black top hat. Talk to him to claim your reward: the Island Medallion and credits to spend in the Poptropica Store!
Congratulations, you have completed 24 Carrot Island!
_____________________________________________________________________________________________
Astro Knights Island Guide
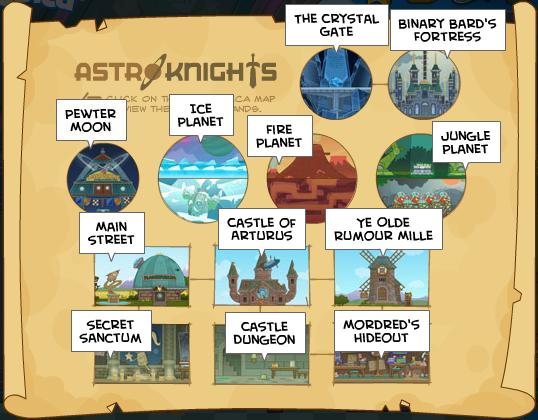
Introduction: Welcome to Arturus!
The star city, always from above to shine. The first building on the left is the House of Mordred, now known as the Museum of Mordred. It contains all the wonderful things Mordred the dark sorcerer used while this he was staying at Arturus. Next is the Space Shuttle Fountain – dedicated to Mordred who brought technology to the town (also contains a secret passageway to a hidden cult).
Next is the Planetarium – Filled with Mordred’s amazing technology in star gazing, unfortunately none of it works besides the telescope. And last but not least is the Crop Circle Inn - a multiplayer room where you can eat, rest, play and chat with your friends. We hope you enjoy your stay at Arturus.
Museum of Mordred
After landing in the town of Arturus, make your way right past the first building and to a space craft fountain. Notice on the top water ring there is something gleaming. It is a Golden Coin. Pick it up.

Now go back to the building you passed and enter it. This building was formerly the house of Mordred – now known as Mordred’s Museum. Unfortunately the manager won’t let you through without paying. Talk to him to obtain a Museum Pamphlet. Go to your items and select Use on the Golden Coin.
Now click on the books to the right of the manager. He doesn’t want you touching them so he will give you a Library Book Slip instead.

As unexciting as it may seem, the book slip is a clue to a hidden dungeon. Notice the underlinedMcM.
Castle Library and Dungeon
Go outside and run all the way to the right until you get the option ‘Go Right.’ Go right again until you get to the Castle of Arturus. Move a little right and enter the castle through a large wooden door.
Once inside go right and enter the smaller door. You are now in the castle’s library (a slightly destroyed library). Inside there are two books you can grab; The Mystical Weapons of Arturus (far left in the fiction area), and The Life of Mordred: A Cautionary Tale (non-fiction area on a stand). Both these books are great reads; just don’t touch the other books, the librarian doesn’t like it.

Go into the Non-Fiction area. Notice the golden plaques with letters on them. Click on the strangely colored brick behind the one with “McM“. A secret passageway to the castle dungeon will open. Click on this entrance to enter it.
You are now in a gloomy room. Walk over the Moldy Cheese to the right on the ground to pick it up.

Go right and click on the handle (lever) on the wall. This will open a small grate to the right, leading to a passage way. Inside is a strange robotic monster. Click on him and a bunch of binary numbers will pop up – this can be translated into the word “Bard.” Now head back up the stairs.
Maid’s Room and Royal Chamber
Once back up in the library you will be confronted by a couple of guards and the unhappy librarian who is now very unhappy. Escape them and run out the door to the right. You will be back at the main castle.
Head left and enter the small door by the stairs. You will enter into a small bedroom with a little mechanical mouse scuttling on the floor and a maid. Walk right into the middle of the room and click on your items. Click on the moldy cheese and select “Use.” The Mechanical Mouse will eat the cheese and you catch him. (The mouse will now be in your inventory.)

Walk right and notice the letter sitting on the chest. Walk over it to pick it up. It is a Secret Messageand it will go into your items. Go back outside to the main castle building.
Head up the stairs and enter the door at the top. This is the Royal Chamber. The King and Queen promise to knight you if you can find the stolen Princess. Ask the Queen if there’s anything else that might help.

She will give you the Coordinates to all the missing knights. It might not make sense for now, but it will soon.
Ye Olde Rumour Mille
Climb back down the stairs and make your way outside. Once outside go to the very right. Click to “Go right” and then right again until you reach a man with a shovel. Talk to the man with a shovel to receive a Bag of Manure, which will enter your inventory.

Next, jump over the two hay bales and walk up the hill and then enter the windmill.
Climb up on the hay bales, jump on the cog wheels, then jump over onto the platform. From here jump onto the rope hanging. Notice this lifts up the rod, stopping the wheels from turning. From where you are, slide down and fall onto the platform where a strange, darkly-dressed girl is standing. She will ask you for a secret in return for hers. She will then hand you a note with 3 symbols on it - a moon, a planet, and a star. These Cosmic Symbols are the new password to the clan’s secret entrance.

Fall down and go outside. Walk to the right until you reach the edge. On top of the turning wheel there is a Coil of Rope. Jump on top of it to take it.

Jump back down and stand under the sign that reads “Ye Olde Rumour Mille.” Jump on top of it and then jump onto one of old mill’s turbines. Notice it will start moving. When this moves around, it opens a secret access point on the roof.
Keep spinning the windmill round and round until the glass cover on the top is open. (Tip: It is a lot easier to stand closer to the center of the turning blades so you can easily jump onto the next one.)
Once the roof is open enter it. Inside, there is a hovercraft. It does not work because it is out of power. Open your items and select “Use” on the Bag of Manure. Once that’s done, the hovercraft will fly out the roof and will land a little above the mud outside. Climb up the haystacks and exit the mill.
Princess’ Tower
Once outside, head left and go past the man with the shovel and go left and left again until you reach the castle. Go left and stand in front of the massive oak door. From here jump onto the windowsill and then onto the platform with a giant bow and arrow on it. Stand in front of it, go into your items and select “Use” on the Coil of Rope. This will attach a long piece of rope to the arrow.
Point the arrow to the left and aim to the top-left. This door on the left leads into the princess’s tower. (Tip: Move the arrow so the tip of the point just touches the window’s outside shadow.) Once fired it should hit and stay into the door creating a walkway from where you are. If you manage to miss the door keep lowering or raising the arrow until you hit it. Walk across the rope and enter the doorway at the end.
Once inside, walk to the far left where a chest filled with parchment sits. Notice the brown paper sticking out. Walk over it to pick it up. It is the Princess’ Note explaining the whereabouts of Mordred’s secrets.

Read it, then make your way back outside.
Secret Sanctum
Go left from the castle until you reach Main Street. Head to the center, where the Space Shuttle Fountain is. Walk into the middle of the fountain and click on the plaque on the wall with space symbols. Remember the Cosmic Symbols the strange girl gave to you? Click the symbols in this order:
- Crescent Moon (looks like a banana)
- Planet With Rings
- 5-Pointed Star
- Sun (in the middle of the plaque)
The fountain will then turn off; the water will drain away and the secret entrance to Mordred’s Secret Order will open. Enter and go down.
Down below there are 5 people in purple hoods and cloaks. Talk to the boy with bad acne on the far right. He will give you a Small Key, which will go into your items.

Once you receive this key, make your way back up the rope on the left and out of the secret room.
Mordred’s Hideout and your Fuel Rod
When you’re out on Main Street again, walk left and enter Mordred’s Museum. Go to the top floor and click under the bed. You will find a Missing Page from Mordred’s Journal containing the location of a nearby moon.

Head back outside and go right and keep going right until you the place called “Ye Olde Rumour Mille” on your Map. Move a bit right again and jump onto the two hay bales there. Slowly move between the two of bales, causing you to fall between them. Once you have done that push the hay out of the way to reveal a trapdoor. It is locked. Now go into your items and select “Use” on the Small Key. You will open the trapdoor. Click on it to go inside.
Slide down the rope to enter the wonderful hideaway where Mordred made his creations. Notice the strange mechanical owl. Walk up to it and click to cause it to fly outside. Go back up the rope to exit Mordred’s hideout. The owl should be hovering just to the right of the hay. Hop onto the ground and go into your items. Select “Release” on the Mechanical Mouse. The owl will swoop down and eat it. It is now your friend and will follow you. Notice that by clicking on the bird, you can control where it will fly. (The owl’s name is Merlin, by the way.)
Now head back down into Mordred’s hideaway. Walk left and pick up the book on the chair, which is Mordred’s Journal.

Walk as far left as possible, until you see a rocky wall block your path. Push against the wall, causing it to bend and shake. Push against the wall for a few seconds to break it. Go along the passageway and crawl through the small hole there.
You will now be behind the bars in the Castle Dungeon. The robot monster inside the cell with you will notice you and will explode (self-destruct), causing his fuel rod to fly up and fall behind the bars. Walk up to the bars, click on the bird (Merlin) and then click on the green rod. The owl will fly down and pick it up for you. You will now have a Fuel Rod.
Excalibur, the UFO
Crawl back through the hole and climb back up outside to where the hay bales are. Jump over them and head right until you get to the edge of the hill. The red hovercraft you found earlier will be waiting for you there. Hop on top of it and steer it with your cursor (mouse). Fly all the way to the right until you find a slightly damaged space craft, or UFO (unidentified flying object). It is called Excalibur. Click on it to access it.
This will bring up some controls with dials and a broken fuel rod. In the bottom left corner drag the fuel rod to where the broken one is. Because there isn’t much fuel, we have to travel somewhere close. Remember the location of the nearby moon on the lost page? Turn the left dial to 56, and the right dial to 52. Then click on “Launch.”
Pewter Moon
You have just arrived at Pewter Moon, but due to the fact that the fuel rod is now depleted, you crashed Excalibur, now you have to find a new ship. On this planet there is little gravity, so you are able to jump much higher than normal. Head over to the right and jump up on the moving platform and enter the doors of the AstroZone building.
The boss, who looks like a green alien, is inside. Ask him how you can get off this planet, and you will be given permission to create your own ship. Wait for your character to reply, “Great! Thanks!”, then go back outside and click on the floating holopad console to the left. The console will pop up and you will be able to create your very own custom-designed rocket ship!
You can customize your wings, body, door, window, engine and guns. You can select each part and change their design even their colors! Different combinations of parts will change the Speed and Shield levels. (Tip: Do a bit more Speed then Shield.)
When you’re finished, click “Done”. You will then be taken back outside with your ship waiting on the pad next to you. Enter it to finally begin your rescue mission. Once inside your spaceship, click on “Launch” to begin flying. The next three planets can be done in any order. You can also click on the screen above the Launch lever to read about each of the planets to help you decide.
Jungle Planet
You are now in control of your spaceship. Let’s first fly in a north-west direction to the Mechanical Jungle Planet. The coordinates are 15, 15. Keep in mind that the area around the planet is inhabited by space aliens. They will fire at your ship so watch out. Try your best to dodge them!
Once you arrive at the planet, click on it to land. When you’ve landed, exit your spaceship. You should be now on a platform with your ship next to you. Fall off the platform to the right. Keep falling down until you reach the ground. Now make your way to the center of the ground. In the middle will be a small platform with the Laser Lance weapon covered with a beam of light. Walk over it to pick it up.

Now go left and jump on a flower. They will spring you up in the air. Jump onto the one on the right, then left, then left again until you reach the platform with you spaceship on it again. Notice the strange bug on the roof. There are more along the way to the right, and they will zap you if you get too close. Wait for the swinging platform to get near, then jump. (Tip: When the swinging platform get to the end then starts falling back then jump, this will cause you to land perfectly on the next platform.)Remember to watch out for those zapping bugs, which may knock you off. Once you have reached the end, go right.
Mother Phoenix
In the next room there is a knight dressed in shining green armor. His name is Sir Cador. If you talk to him, he will tell you to save the princess from the cage to the right. To do so you should climb up the rope. You will then have to pass by four mechanical eggs that may knock you back if you do it incorrectly. Directions on passing them so that you can get to the cage:
- Wait until the first egg opens, then jump on it.
- Now wait on here until the second egg opens, then jump on the that.
- Now on this second egg, as soon as the third egg opens, jump immediately because that egg will open fast.
- Nowquickly jump onto the last one and jump onto the cage with a unicorn in it.
- Click on the cage to open it and again. Doing so will cause the Mother Phoenix to come. Ready to fight?
First off, it’s a lot easier if you keep your lance charged. The bird missiles can only be shot down with a fully charged lance shot. To completely charge up your laser shot, click and hold with the mouse until it is glowing very brightly. Click again to shoot.
Avoid the flying bugs, or you can shoot them with short little shots. Short laser shots can be made simply by clicking over and over again. Watch out for electric clouds. They’re the dark black clouds that will shoot out with lightning every now and then. They can be harmful, so simply move out of their way. After a while the Mother Phoenix will arrive.
When her mouth is open, shoot at her mouth. If you aimed right, her body will start flashing red, indicating it had been defeated. You’ll have to do this three times to beat it. If you missed, it’s usually a good idea to stay away and wait for her to fire her missiles and leave. Wait for the Mother Phoenix to come back, and she will either charge at you from the left or the right.
If she comes from behind you, quickly avoid her by staying at the very bottom or very top of the screen, opposite of the area she is in. It is impossible to shoot at her when she is behind you. Simply wait for her to pass, and come back facing you. (May take a few times.)
A good tip is for you to stay at the bottom of the screen. It can’t hit you there often. Once you win, the green knight (Sir Cador) will join you. When you are back inside your rocket ship, click “Launch”. Then press the “Teleport Home” button, which is right above the area it shows what coordinates you are at.
Fire Planet
Fly in a north-east direction to the Fire Planet. Its coordinates are 83, 20. Along the way there is a black hole, which you should avoid by going around it. The area around the planet is also inhabited by space aliens. They will fire at your ship, so be careful. Once you see this dark red planet, click on it to land. Then exit your spaceship.
Below you is lava, or really hot water. If you stand in it, you will be teleported back to your starting point beside the ship. The hard thing about this part is timing. Make sure that before you jump to the next platform that it is close enough for you to land on. (Tip: When you get to the second last platform, it is easier to jump on the one before, wait for it to get to the bottom then do a huge jump to the last platform.) After you get to the last platform, enter the volcano.
The next part can be quite annoying for some people. It requires you to be patient until the moving gas stops and you’re able to move and hide. If you aren’t careful, it will send you all the way to the top of the volcano. Once you reach the end you don’t have to worry about it. Now go through the passage.
Halfway through this is a strange creature that whacks and rolls at you. Jump over it when it rolls. Keep going left until you meet the red knight. His name is Sir Pelleas. Ask him what you should do and he will give you an Ice Arrow.

Continue forward and get ready to fight a dragon – it is known to Poptropicans as the ”Dragotank.”
Dragotank
When you enter the room jump onto the hanging chains, then jump across them until you reach the other side. Jump down, dodge the spiky tail and then walk under the switch. Jump up and click on it. This will cause him to temporarily shut down. Jump out to the side where you started and fire an Ice Arrow in his mouth. Do this three times to defeat him. (Tip: When he starts to get angry after you shoot him, jump on the chains, dodge the falling spikes and get to the other side to do it again.)
Once you defeat the Dragotank, the red knight (Sir Pelleas) will join you in your mission. Back at your spaceship again, press “Launch“. Then press the “Teleport Home” button.
Ice Planet
Start flying in a south-east direction. The coordinates to the Ice Planet are 73, 83. The only problem about getting to the planet is that it’s protected by three space sharks. All you have to do is get them to all follow you by shooting at all of them. Do this by getting near them (note: Do NOT touch them!), then click once for each shark to shoot something. This will get their attention. Once they are all following you lure them into the black hole which is north to the right a bit at the coordinates 84, 47.
If this is too hard, just attract them one by one. (Note: Make sure you keep them in view when you fly to the black hole because they can stop following you.) Be extremely careful not to get sucked into the black hole yourself, because you will just be teleported back near Pewter Moon without having done anything to the sharks. To get the sharks sucked into the black hole without pulling yourself in instead, simply fly around the hole and avoiding any parts of it at all costs. You will know that a shark gets sucked in when you see the yellow scrolling message at the bottom of the screen telling you that they have been eliminated.
Once you land, exit the ship. You are now standing on a platform of ice. Below you is icy cold water that will freeze you if you land in it, causing you to teleport back next to the ship. Jump onto the floating platform to the left, and keep moving left until you reach the end. (Tip: Make a giant leap to the center, and watch out for the jumping helmet fish, which can knock you into the cold water.) Once you reach the end, go right.
Quickly climb up the mountain and watch out for the gigantic falling snowballs. At the very top is the blue knight. His name is Sir Gawain. Ask him if you can help, and you will receive a Force Shieldnecklace.

Tigercopter
You will have to defeat a Tigercopter, which is a tiger and helicopter combined into one menacing creature. Use your force field to hit the snowballs back at the Tigercopter. Watch out for when it falls, because it will destroy your force field for a certain time. After he falls, a large snowball shoots out that will freeze you, so jump over it. You must repeat this three times in order for it to be defeated.
Once you have destroyed it, the blue knight will come with you. You will return to your spaceship. Click on “Launch,” then click on the ”Teleport Home” button.
Crystal Gate
Once all 3 knights have been rescued and reunited, you will be able to visit a legendary asteroid known as the Crystal Gate. Start flying in a western direction. Its coordinates are 11, 82. Beware though, because this planet is surrounded by asteroids. Be sure to avoid bumping into the asteroids!
Once you land, exit the space craft. Climb up the crystal mountain to the top where the 3 knights (Sir Cador, Sir Pelleas, and Sir Gawain) are waiting. You are the fourth knight! Click on the sword. This will cause a small portal to form, which will suck in the sword. Enter it.
You will land on top of a castle. It is Binary Bard’s Fortress. Go down the bottom and talk to the princess. She will ask for your 3 weapons. Once you have given them to her, the princess will turn into Binary Bard. It turns out that “she” was a fake and that the evil Binary Bard has tricked you! He will disappear.
Click on the strange wall next to you. A puzzle door will appear, which you must solve in order to get through to the other side. The picture below will show you how to solve this puzzling puzzle. They are numbered in the order you must click on each piece. The completed puzzle should show a picture of Mordred, with words at the bottom announcing that he is “ruler of the universe.”
The image below tells you the order of which puzzle piece to click, to solve it.

Defeating Mordred
In the first round, you will be using Merlin, the owl. Fly him over and pick up the explosive bombs Mordred drops. Pick them up and drop them on the green orb on top of Mordred’s robot. Make sure you drop them only while they are flashing red, otherwise it won’t work. Also, avoid the flying bombs he throws, which lower Merlin’s health. Do this two times. Once complete, Mordred will destroy Merlin.
Now it’s your turn! Lure Mordred to the center, just underneath the princess. Then jump on him from under him and onto the princess’s platform. From here jump on the chandeliers on either the left or right. Wait for him to go underneath and he should fire a red laser beam at it, causing it to fall on him. Do this for both sides (if you did it on the left the first time, do it on the right, and vice versa). Once this is done, Mordred will be no more.
Your Reward
You will then go with the real Princess back to Poptropica be knighted by the King and Queen. The Princess will have had Merlin repaired, and you can find the owl flapping around in the Royal Chamber. You’ll receive the Astro-Knights Island medallion and credits to spend at the Poptropica Store.
To show that you have received your knighthood, the King will call you by your knight name just before you get the Island Medallion. If your character is a boy, it will be “Sir”; for girls, it is “Lady”. This title will then be followed by your Poptropican last name. (For example, if your Poptropican name is Scary Tomato, your last name would be Tomato.) If Scary Tomato’s character is a boy, he would be “Sir Tomato”. Please bear in mind that this does not apply to your name in multiplayer rooms.
Also, if you look back at the Space Shuttle Fountain, you’ll notice that Mordred’s green orb has been placed there. Power has been restored to Arturus, and the town is saved. Congratulations!
(Tip: If you would ever like to return to outer space, your space rocket will be waiting for you on top of the castle of Arturus.)
__________________________________________________________________________________________
Back Lot Island Guide
When you first arrive on Back Lot Island, the paparazzi will be all over you until they realize you aren’t famous. They’ll run off to a celebrity named Willy Bingleman, who was going into Queequeg’s Coffee Shop (on the far right). Go inside the coffee shop.
Once you step inside, go talk to the homeless man. It’s former child star Willy Bingleman!

He asks you lots of questions, like, have you seen my movie or have you ever heard of me, but you say I haven’t seen or heard of you before. So, he says I will star in a big movie one day, again. Leave the coffee shop, and go one shop over to the left. It’s called One-of-a-Kind Talent Agency.
Once you get inside, go all the way to the right. There will be a woman at the desk. She says you look like a star, and you say, “Me, a star?” Then she says if you pay a thousand dollars, she’ll help you get started on your career.

What!?! A thousand dollars? I don’t have a thousand dollars! But then she tells you to go to Harvey Scoops if you’re looking for money. Now, leave the building and head right to the next area – Sunrise Street.

Once you get there, head past the theater and souvenir shop until you get to a wall with a guy standing next to it. He says he’s Harvey Scoops!

He’s investigating the place because rumors have swirled that someone’s been working in there. Ask if you can help, and he says yes. Harvey also asks you to climb the building and get a picture. You’ll receive a Telephoto Camera.

Now, go all the way to the far left on Main Street, you will see a guy with camera in front of the Celebrity Wax Museum. Click “Use” on the Telephoto Camera and he will give you some Camera Film.

Now, go back to where Harvey Scoops is at and climb the building. Go to your list of items, and click “Use” on the Camera Film. It will combine with the Camera to make it work. Now, click “Use” on the camera and take a photograph of a man with a beard, in the building next to the Souvenir Shop. Once you take it, you’ll feel an earthquake, and then you’ll fall into the property.
After regaining consciousness, run right and click on the door to enter the stage.

When you click on it, the assistant director of the movie will come out. She asks if you’re security, and you say no. She’s happy about that because she doesn’t want the movie to be interrupted. Ask about the movie, and she says it’s being made by Carson Willis, the greatest filmmaker of all time, who has been missing. After you finish talking to her, enter the building.
Kirk Strayer
Once you get there, run left onto the stage, where movie star Kirk Staryer is acting. He gets mad that someone always interrupts his scene, so he runs off with Carson Willis chasing after him, trying to get him so they can continue the filming. Here’s what the cameraman said:

After Kirk and Carson leave, follow them. Once you get outside, you’ll find the assistant director freaking out about the schedule, telling you to go get Kirk back. And… you get a sweet ride in the deal! Your very own cart! It’s all mine baby, it’s all mine! MWHAAAAA!

Once you leave the first stage, you need to look for Kirk’s trailer. So drive straight down until you reach the far bottom wall, then turn around and go up to the right a lttle bit and you will see his trailer. If you don’t see it, here’s a picture to help you out.

Getting the coffee
Once you get there, knock on the star door. Kirk Strayer will tell you to go away, but you ask him what it’s going to take to get him out of there. Strayer says he wants a Half-Caf Leviathan Latte-Expresso on the double. Then a cup comes out of the skylight on the trailer.
Now, hop on your cart, and head back to Soundstage 1. Then go all the way to the left and open the gate so you can get out and fetch his coffee.

Run all the way back to Main Street, and enter one of the two Queequeg’s Coffee Shops to refill Kirk’s cup. The guy at the register will tell you he is out of that particular drink so you will have to choose another. Choose the coffee shown in the picture below to get an Infant-Sized Coffee (decaf espresso).

Now exit the coffee shop and run to the left until you get to the other coffee shop. Talk to the lady at the register and she will also tell you she is out of that particular coffee. Order as shown in the picture below for an Infant Sized Coffee (full latte).

Now open your menu items and choose the Infant Sized Coffee. Pour both cups of coffee into the larger cup and you will have made the coffee that Kirk wanted – a Half-Caf Leviathan Latte-Espresso. Tadaah!
Go all the way back to Kirk’s trailer after you have done this. Knock on his door again and you will tell him you have his coffee.
Filming
Jump back into the cart and go back to Soundstage 1. Once the old guy stops talking, jump up the wooden stairs and use the camera. When using the camera, just make sure to keep Kirk in the middle of the screen at all times, demonstrated in the picture below.

Screenplay gone astray
Once you are done filming, exit Soundstage 1 and jump into your cart again. Go all the way to the right until you get to Soundstage 2. Enter the soundstage and talk to the lady there.
Now exit the soundstage and go back to Soundstage 1. Jump to the top of Soundstage 1 using the ledges on the left. Talk to the guy on top of the building, Goldie, and his precious screenplay will be blown away to Sunrise Street.
Now go to the left and go back to the top of the green building. There will be a screenplay page on the TV antenna on top of Juan’s Celebrity Souvenirs.
Continue left and get to the top of the Chinese theater building. To get to the top, use the sides of the roof to help you bounce high enough (see picture below). You will find another screenplay page on top of that building.

Keep going left until you get to the first Queequeg’s Coffee House (right of the Talent Agency), where you should find another screenplay page on the neon sign at the top. Keep going left until you get to the Celebrity Wax Museum and the last screenplay page will be on the far left of the roof of that building.
Once you have all of the pages, go all the way back to the right and talk to the guy on top of Soundstage 1. Give him the pages and jump back into your cart.
Go back to Soundstage 2 and talk to the lady again. Now it’s time to put the script pages in order. Open the scripts from your menu and rearrange them so that the 3rd one is 1st, the 4th one is 2nd, the 1st one is 3rd and the 2nd one is 4th.
Playing the part
Lead Actress
Now you will be given an Actress Headshot and it’s your job to find someone that looks like her to play a lead in the movie. Exit the soundstage and go back all the way to the beginning of the island and enter the One-Of-A-Kind Talent Agency. Give the lady at the desk the headshot. The lady at the desk will surprise you – she’s actually Lacey Williams!
Acting as the Navigator
Now head back to Soundstage 2. Once you get there, you will have to play the role of the navigator. Go to the left and jump up to change into costume.
- The first thing you say in the film is “But-”
- When it comes up, offer her a compass.
- Next, say “Safe journeys! I’ll never forget you!”
- After that, your next line is “Noooooo!”
Prop train
Now exit the soundstage and go to Soundstage 3 which is opposite of Soundstage 4 and to the bottom of the back lot road map. Enter the stage and talk to the lady on the left. Now you will have to put together 3 puzzles to build a prop train. You’ll be given more than enough wood pieces, so there are multiple ways you can finish the puzzle, but here are some possible solutions:


Casting the cowboys
Once you’re done, run to the right, jump above the door, and grab some cowboy hats – you’ll need a white one and a black one.
Now exit Soundstage 1 and go back to the beginning of the island so you can find some actors. The first one will be in the first coffee shop – remember Willy Bingleman? Give him the Black Hat (go to your items and click “Use” on it).
The second will be in the Digital Dreamscapes studio and looks like the guy in the picture below, who’s wearing a motion capture (mocap) suit. Give him the White Hat.

Calling the shots
Head back to Soundstage 3. Once you get there, talk to the lady (Sofia) again. You will now be the stunt coordinator. All you need to do here is press on the buttons that relate to whatever the director calls for: a tornado, a villain (hat), or a buffalo.
Gorilla gone wild
Once you are done, exit the soundstage and go to Soundstage 4, which is all the way to the right and down a bit. Enter this soundstage and you will now dress up as an ape and your role is to destroy the city. To do this, just jump on the buildings, pop all of the balloons, and destroy all of the lights!
“Jump on the rooftops all the way to the top to collect the red balloon. Be sure to pop all the green balloons on the way.” While you’re jumping, cannons will be shooting at you, slowly lowering your “life” bar. The trick is that you can destroy the cannons by hitting them and you can smash the army men by landing on top of them. There’s one level that’s the toughest because it has three army men. Try to jump on all three of them at once. When you get the red balloon, you win.
Post Production
Once you are done filming, exit the soundstage and go to the Post Production building which is the one across the street to the left.
Film Editor
Talk to the old guy and then head to the film editing computer to the left. You will have to cut some shots out. “Can you find the mistake? Scrub through each scene and locate the frame with the error, then splice it out with the razor.”
You’ll see three rolls of film. In each roll is something that is off. The first one has a yellow banana, the second one has a boom mic in shot, and the third one has stuffing coming out of the bear.
Use the bar at the bottom of each roll to move it forward or backward one frame at a time. When you see the mistake, click on the razor blade at the right. Then left click and hold to cut between the green lines. Cut above the film cell and below it to splice it out. Do it three times to finish.
Foley Sound
Click on the director, who will tell you it’s time to add sound. Follow him into the sound editing (foley) bay to the right. Click on one of the sound effect props.
“Each of the scenes needs four sounds added at the right time. Click on the correct sound when you see the indicator flash on screen.” There are 16 sound effect (SFX) buttons along the bottom. In the middle is a rolling film. At the top is a digital screen which will flash and tell you which SFX button to hit.
First clip:
- Rain (rustling paper)
- Thunder (metal sheet)
- Balloon popping (balloon)
- Balloon hitting water (cup of water)
Second clip:
- Fireplace (match and can)
- Plates rattling (plates)
- Bear growling (bear)
- Ghost moaning (ghost)
Third clip:
- Buffalo (buffalo)
- Horses galloping (coconuts)
- Train (brushes and whistle)
- Punch (paddle and meat)
Fourth clip:
- Airplane (fan)
- Kong landing on building (anvil hitting box)
- Gorilla howl (gorilla)
- Kong falling (bottle)
Once you are completely done editing the film, talk to the old director again. He will give you Film Reels to take to the Chinese theater!

The Many-Splendored Zephyr
Now head all the way back to the beginning of the island and go to the theater. Talk to the lady standing outside of it and say “He’s a strange guy, what’s his deal?”
Enter the theater and run to the right. Now jump up and use the seats to go all the way to the left to the projector room. Use the film reels to add the movie to the projector. Enjoy the show!
Once the movie is over, exit the theater and talk to the lady (Sofia) once again. She will give you your gold medallion and credits for the Store! Congratulations, you’ve completed Back Lot Island!
Bonus Quest (members only)
But wait…there’s a bonus quest to be had. Sofia tells you that a camera was left on in Soundstage 1. The bonus quest description: “Sneak into the studio and evade security to win a new prize in this island’s bonus quest! Plus, get a bonus prize pack of costumes and items.”
Enter the studio and go to Soundstage 1. Jump up to the camera to grab it. Just as you do, the Warren sisters, the owners of Grand Majestic Studios, will catch you and accuse you of trespassing. You hightail it out of there.
Avoid Back Lot security
 “Avoid and outlast the Back Lot security. Collect (rockets) for speed boosts. Collect (green balls) for extra protection.”
You’ll be in your cart and need to dodge the security carts that come after you. The trick is to just stay to the outside roads as much as possible. Don’t try grabbing the rockets or green balls, just keep moving. It’s a little challenging, but not super difficult.
Another tactic for finishing the bonus quest is to get a maximum of two carts after you and go to Soundstage 4. Make sure that the two boxes at the end get piled up on top of each other so that even if security pushes them over, they can’t get to you. Make sure you do this AFTER you push yourself in there. They can surround you for about 15 seconds without them catching you, so you’ll have enough time to move the non-mobile cart. Voila!
The reward is a cool hand-held Movie Camera! Congrats!
____________________________________________________________________________________________
Big Nate Island Guide
Table of Contents
1) Comic Strip Frame Locations
2) Big Nate Island Guide
2) Big Nate Island Guide
Comic Strip Frames
- Pop-In Shoppe – On the green couch, on the top floor.
- Klassic Komix – Talk to the guy to receive the frame.
- Photo Studio – On top of the light, to the right.
- Main Street – On a telegraph pole, to the very right of the street.
- Inside the School – On a speaker, on the top floor.
- Science Lab – On the Planet Mobil, to the left.
- Outside the School – On the wooden scaffolding, to the right of the school.
- The Playground – Floating in the air, on top of the climbing wall.
- Puffin Point – On top of the lighthouse.
Big Nate Island Guide
With only a Lobster, a pack of Stale Gum, and some Peanut Butter Crackers, you can find a Time Capsule any day.
Main Street
First, to get onto the island, hop into the yellow blimp (located on Main Street of whichever island you’re on right now) and travel to the island named “Big Nate.” When you arive at the Main Street you will be greeted by Big Nate. He will tell you that he is on a search for a time capsule hidden a hundred years ago.
Head to your right and enter the shop named “Pop-In Shoppe”, a store run by Nate’s dad. At your left there is a bulletin with some background information on the time capsule. If you go to the top floor, on the green couch there is a comic strip frame. There are nine of these frames hidden around Big Nate island and they all join up to make a comic strip that will help you later in the game.
Go back outside and go to your right. Enter the “Klassic Komix” building, which is full of comics and other cool stuff. Once inside talk to the guy. He is looking for a comic he lost, he will provide you with a comic frame for it. Exit the building.
Pass the “Cap’n Salty’s” building, which is the island’s multiplayer room, and then enter the Photo Studio (the large camera), a building run by the “School Picture Guy”. On the right there is a comic frame sitting on a light. Pick it up then go back outside. Now on the right of the “Photo Studio” there is a telegraph pole you can climb. Climb to the the top to obtain another comic frame. Jump back down and go right.
School
You are now outside the school, where there is a large bell on the top (more information can be found later on in the guide). Head to your right and go inside the school. Inside there is a science lab, some rundown lockers, a detention hall, and a secret room. Go to your right, jump up the stairs and grab the comic frame. Enter the door labeled “Science Lab” on your left.

Once inside the room, make your way next to the science geek, a boy named Francis. Click on the chemistry set next to him. Turn on the heater to 4, then pour half of the beaker with blue liquid and half with yellow, which will make a greenish color. This will produce a Stink Bomb. It will be useful later.
Go over to your left towards the Mr. Bones skeleton model and grab the comic frame on top of the planet mobile. Make your way out of the science lab and out of the school.
Climb up the wooden scaffolding on the right of the school. Grab the comic frame on it. Now go right to the Playground.
Playground & Kids’ Club House
Climb to the top of the playground and head left so you are on top of the climbing wall. Floating above you is a comic frame, so grab it. Go right and enter the ‘Kids Only’ house. Win the “Go To Jail” game to obtain the Peanut Butter Crackers.

If you want to, you can win at “Table Football” to obtain a book called Big Nate’s Pratical Jokes (note: You don’t have to play Table Football, but you do need to win Go To Jail). Go back outside and travel right to reach “Puffin Point”.
Puffin Point & Big Nate Comic
Go right and climb up the Lighthouse. On the very top of the light house is a comic frame, grab it. You now have collected all the comic frames. Click on your Inventory, then examine the Big Nate Comic. Arrange them so they spell: “Nine Three Zero Five” in between the strip. This is the order they are in (going from left to right, top first, then the bottom):
- Uh… excuse me… | Hm?
- I’m new here, and… um… I’m sort of lost. | Ah! Nate Wright at your service, dude! Where do you need to go?
- I’m trying to find the art room. | Art room! Gotcha! Stand here!
- Uh… here? | Right there! And don’t move!
- But… | Klik!
- FOOOMM!
- Well? | You overshot. He reached the nurse’s office.
- Dang! | …Which is probably a good place for him to end up.
You have formed the Big Nate Comic! Now exit the comic strip. Ask Mr. Rosa, the man who is painting, if you can look through the telescope. Look through the telescope and you’ll see that to your right, there is a scroll under a rock. Exit the telescope.
To the left of the lighthouse is an old picture floating around in the wind. Try and grab it by jumping around starting at the lighthouse ladder. This may take a couple of tries.

Once you have collected the Old Photograph, head back to Main Street by going left.
Scuba Diving, Jet Skiing, & a Lobster
Keep going left, left, left, until you reach the Photo Studio building (the large camera). Enter the building. On the left you’ll find the ‘School Picture Guy’, who has a golden scuba suit he will trade for a photo. Swap the photo for the Scuba Gear.

Now leave the building. Walk left and enter the building “Klassic Komix”. Talk to Gordie (the shopkeeper) again, and tell him you found his comic. He will be so glad that he will let you keep the comic and let you have a Stale Pack of Gum as a prize.

Exit the building and go right. Make your way back to Puffin Point, so go right, right, right, right…until you reach it. Head right past the lighthouse and talk to Cap’n Salty. He needs your help to rescue the lobster trap from under the water. Go into your Inventory and put on the scuba gear.
Jump off the dock and dive down. Swim all the way to right until you can’t go any futher, then swim down until you reach the Lobster Trap. Pick it up and wait until your oxygen runs out.

Once you are back at the start, swim up. Talk to Cap’n Salty and tell him you have his trap.

He’ll let you have two items – the Lobster and Jet Ski Keys.
Jump on the skis on your right and ride away. Big Nate will challenge you to see who can get there first. The best way to beat him is to try keep your computer’s mouse as far to the right side as you can and to move farther and gain some distance from him. Once you arrive at the rocks (it’s called “Sealsaw Rock on the Map) jump on the tilting, seesaw-like rock. Push both of the cute seals to the left side of the rock.

Now you can jump down and take the scroll. The scroll is the Map to Capsule. Ride back to Puffin Point. Climb back up the lighthouse to the light. Go to your Inventory, select the “Lobster” item card, and click “Use” to your lobster to turn the light around. It will scare away the bird at the top of the school bell. Jump off the lighthouse and go left.
Nate’s Locker
Go left to the Playground. The capsule is here but it is guarded by the girls. Go left, enter the school building, and jump up to the second floor. Run left to the lockers and click on one spilling with papers. Enter the locker code found on the comic – 9305.

Once the locker empties itself, click on the papers again. You will find the School Blueprint. If you examine it you will see that there is a secret room. Now the only way to move the girls is to ring the bell, but the bell is missing its clapper. The bell clapper is hidden in the secret room.
Secret Room
To get to the secret room you have to go through the detention room. To enter the Detention room stand outside the detention room door and chew on the gum by going to your Inventory, selecting the item card “Pack of Stale Gum,” and clicking the “Use” button. The teacher, Mrs. Godfrey, will take you inside. The secret room is through the filing cabinets.
Use the stink bomb to move the teacher. Go to the right and click on the filing cabinets. It will reveal a hidden ladder. Then go down. Once you’re down at the bottom turn on the power by clicking on the power lever. On the right above the work bench should be a bronze bell clapper.

Jump up and grab it to obtain the Bell Clapper. Make your way back up the stairs and outside of the school. Go to the top of the school, use the bell clapper, and ring the bell. The girls will now leave their place.
Uncovering the Time Capsule
Go to the Playground and stand between the two posts, between the monkey bars and the logs. Open your items and use the Peanut Butter Crackers. The dog will then dig a hole, showing the time capsule hidden underneath. Click on the hole and pull the capsule from it. Click the lock to open it.
Watch the dialogue between Big Nate and his friend Jenny, who convinces Nate to use the valuable pearl inside the capsule to save the school even though he doesn’t really want to. When the newspaper (called “The Clam Courier”) appears, click close at the top-right corner of the gamescreen. You will then be confronted by the teacher who will award you with the Big Nate Island medallion and credits to spend at the Poptropica Store!
Congratulations! You’ve completed Big Nate Island’s quest. If you are looking for more things to do, take a ride in the blimp for a new adventure on another island. Or check out the multiplayer rooms located on Main Street, where you can chat and battle with other Poptropicans!
___________________________________________________________________________________________
Blimp Adventure Guide

Travel to the edges of Poptropica and beyond with your own inflatable, 30-inch Poptropica blimp. Players who get the Poptropica blimp will unlock an exclusive in-game adventure! Buy the Poptropica Blimp.
Getting Access to Blimp Adventure
Blimp Adventure is a special mini-game that you gain access to when you purchase the Poptropica Inflatable Blimp Toy. When you enter the code that appears on the green coin that comes with your toy, you’ll get the Blimp Adventure gold card in your backpack inventory and can play the game using the card.
Basic Gameplay
Move the blimp with your mouse, and click your mouse button to pour water onto a burning building. Refill your bucket by dunking it in the water below. The red meters above the buildings show the amount of damage. The meter will disappear when the fire is put out. If the meter gets filled completely that building will be destroyed. You lose the game if too many buildings are destroyed. If you lose, you have the option to play the level over using easy mode, where your water lasts longer.
Once you put out all the fires, the level is complete. Dr. Cumulo Nimbus will appear and taunt you before moving onto the next level. As you progress through each level, they get harder and Dr. Cumulo Nimbus introduces new weapons that make it harder to navigate your blimp and put out the fires.
Level 1 – Introduction
This is a very basic level where you learn how to play the game. All you need to do here is drop the water on the fires. Refill by dunking the bucket back into the ocean and then return to putting out the fires once your water level (the blue bar in the top-right corner) is full. There are three islands with huts on fire. The first two only have one building each and the third island has three.

Dr. Cumulo Nimbus Attacks the first set of islands.
Level 2 – Mines
In the second level, things get a little tougher. Dr. Cumulo Nimbus deploys air mines. These are floating mines that damage your blimp if you hit them. They’re only dangerous when armed, which is when the red lights on them are lit. All of the fires are on one island and they’re closely grouped together. So it’s fairly easy to put out all the fires as long as you successfully avoid touching the five mines that he places above the island.

In the second level of Blimp Adventure, you have to watch out for the floating air mines above the island.
Level 3 – Lightning Mines

There are a lot of buildings on fire in the main island on level 3 of Blimp Adventure.
Once you advance to the third level, you’ll find that Dr. Nimbus has a nastier kind of mine that he will use to try and stop you. These are the lightning mines, which are blue. When lit, they will shoot lightning bolts at you that damage your ship. You’ll get attacked if you get close enough to the mine–they can attack without you touching them, making them much more dangerous than the normal air mines you encountered in the previous level.
In this island, there is a small fire on the lighthouse at the beginning and several large fires burning in the town to the right. It’s easiest to take care of the lighthouse fire first and then move to the big island, but if you don’t move quickly enough, you’ll probably lose some of the buildings.
Level 4 – Smart Mines
In this level, you’ll need to put out a series of fires that are burning a large castle on a single island. The good news is that there’s only one area to focus on, meaning that you don’t have to fly back and forth between fires. The bad news is that in this level, you’ll encounter smart mines along with the other mines from the earlier levels.
These new mines have yellow lights and they will follow you around, so you can’t stay in one place for too long. Fortunately, they don’t move very fast. You can “shake off” the mines for a while by flying off to the side and letting them follow you, and then return to putting out the fire.
Level 5 – The Boss Battle
In this final level, instead of putting out fires, you’ll pick up snowballs at the bottom of the screen and then drop them on top of Dr. Cumulo Nimbus’ fortress. In addition to mines, there are ice cannons that will aim at your balloon and shoot at you. If you get hit, you’ll take damage and you’ll drop the snowball if you were carrying one.
While avoiding the mines and cannons, pick up the snowballs and then carry them above the fortress in the middle. Once in position, drop the snowball and you will damage the fortress. Do this enough times and you’ll win the level–and the game. Remember that once you pick up a snowball, you have to keep the mouse button pressed to carry it. Release the mouse button to drop the snowball once you’re in position.
_____________________________________________________________________________________________
Charlie And The Chocolate Factory Guide
The Golden Ticket
First, when you get to Charlie and the Chocolate Factory Island, talk to Charlie next to the blimp. He says he will do anything for money, then walks away. Follow him all the way to the left, enter into the next area, and go all the way to the left to the payphones. Click on the one on the far left.

You get some money, then same guy who asked for money earlier comes out of Charlie’s house. Follow him, and enter the Corner Shop. When you get in there, he is right next to the counter.

Give him the coin so he can buy a Wonka Bar. He asks you to open it for him. Like the polite person you are, you open the candy bar, and you have the Golden Ticket! You tell Charlie to run and you push the people away. People will chase after Charlie. Follow them out the door, then there’s a game you have to protect Charlie from the townspeople!

The game’s pretty easy. Just click on the crates, trash cans, and piles of snow so Charlie doesn’t become dead meat!
The next morning, the townspeople are looking for Charlie when a golden ticket flies out of the sky! The townspeople chase after it, and it goes into Charlie’s area, where his home is! Run to the area. Follow the ticket all the way up here.

Finally, after all that chasing, you get the Golden Ticket! Gosh, those townspeople must be mad. 

Go back to Main Street, and run to the right, all the way to the Chocolate Factory. Wow, the townspeople are not even mad. Something fishy is going on here. Anyway, the gates to the factory open for you.

You go inside the gates, and all the people who got a Golden Ticket are there. The factory owner, Willy Wonka, asks for all the tickets, and you’ll go inside the factory.
Willy Wonka’s Chocolate Factory
When you go inside, all the kids except you and Charlie act up and run away. Willy Wonka wants to find them, and asks you to get him his cane.

When you get the cane, run all the way to the right. You enter this place with has a room selector. Click on Chocolate first.

There’s a hand above that points which way to go. Follow where the hand tells you to go. After a while the hand leads you to the Chocolate Room, which looks like this (epic picture below by Poptropica artist Nasan Hardcastle):

The Chocolate Room
Augustus Gloop has gone nuts and jumps into the river…. and now he’s stuck in the chocolate tube.

Augustus… No!!
When you notice that Augustus is stuck, click on the wheel next to you. It pushes Augustus up the tube.

Now Augustus is still stuck at least halfway up.

Why are you so fat, Augustus! Why?
Now, you have to use another wheel, located above Augustus and to the right a little. Click on it, and it should shoot him up a little more. Now you have to use the third wheel, located to the far left of Augustus. Click on it.
Then a bunch of Oompa-Loompas will come in and sing “Augustus Gloop, Augustus Gloop, the Big and Greedy Nincompoop.” They take Augustus’s mom to the Fudge Room to look for her son. Follow them there.

The Fudge Room
You’ll see Augustus stuck in a tank. Click on the wheel beside him.

He falls down onto the conveyor belt covered with chocolate. Jump all the way to the left onto a platform and click the green button.

Now, he can pass without getting chopped into pieces. He falls down to the next level, when he gets near the Wonka-Oven. Click on the button with blue fire.

When you press the button, the oven should look like this.

Quick! Now, jump onto the platform to the right and click this red button.

Now, when you press the button, the oven should look like this.

He’s going to go down to the last level. Click this orange button when he gets to the Bigger Wonka-Oven.

Now when Augustus gets in between the flames, press the next button in line. When you finish, he comes out and leaves. You leave the room too, and come back where you choose a room to go to. Click on the Television Room, and follow the hands until you reach the room.
The Television Room
When you get to the TV room, you’ll find Willy Wonka teleporting his biggest candy bar through television. Then Mike Teavee decides that he wants to be the first person to be teleported through television. He gets zapped and finds himself in the television across the room.
There’s an Oompa-Loompa next to the television. He says he was watching his show but it went on the fritz, so he asks you to adjust the antenna.

The antenna should be like this when you’re done.
After you fix it, you’ll be able to see Mike clearly. An Oompa-Loompa comes onto the screen and leaves with Mike. Go into the Bubblegum Room.
The Bubblegum Room
When you get to the bubblegum room, you’ll see Mike hung up. The Oompa-Loompa tells you to go to the monitor to try to save Mike. It couldn’t hurt anything, right?

Just keep adjusting him until it reaches the Poptropican size on the screen. Go back to the halls and click on the Inventing Room. Follow the hands until you reach the room.
The Inventing Room
Violet Beauregarde is right next to the Gumball Machine. Step on the yellow button in the middle.

Some Yellow Bubblegum will come out. Violet will chew on it and turn into a Big Blueberry. They take her to the Juicing Room which is to your right.
The Juicing Room
Now you’ll have to save Violet. Adjust all the fruits into the right position (follow the picture below):

It should look like this when you finish.
Now Violet is squeezed back to normal size! Next, head to the Nut Room.
The Nut Room
Veruca Salt is there, begging her dad for a squirrel. Walk over, and when you pass the squirrels, you’ll get a Walnut. Then Veruca jumps up and trys to grab a squirrel. Some squirrels jump on her and push her down a hole. You jump in after her.
When you get in the Incinerator, jump up to the right and pull the chain. A Giant Gumball comes out. Push it right to the fan.

Pull the chain again, and push the Giant Gumball right until it falls into the doorway.

Jump over the Giant Gumball, then run right and pull the generator switch.

Jump down to the bottom left, where there’s another generator and a trash can. Push it back left until it is in front of the doorway. Then pull the second generator switch.

You think you’re done? Nope, another generator has started up again. Jump up and to the right, you’ll see a squirrel turning a wheel. Use the Walnut. The squirrel will stop, and you’ll save Veruca Salt and her dad! But before you leave, get the Whipped Cream and Fizzy Lifting Drink. To get out of the room, use the Fizzy Lifting Drink.
Hi, my name is Wonka Charlie, and I work in a chocolate factory…
When you go back to the hallway, you will notice that the “Chocolate” on the room selector is blinking. Click that, and follow the hands so you know where to go.
When you arrive, Willy Wonka is there with Charlie Bucket, deciding to give the keys to the factory. Suddenly, the land Charlie was standing on breaks off! Talk to Willy Wonka and say you want to save him. This will start a minigame.
In the game to save Charlie, you need to to make your way across the river. You can use the Whipped Cream to help you make temporary platforms for you to hop on. The orange logs are safe for you to jump on for any amount of time. Make your way around to the right and save Charlie with Wonka’s cane.
After you save Charlie, Willy Wonka gives the keys to Charlie, and you get a lifetime supply of chocolate and visiting rights to the factory whenever you want. And, of course, the island medallion, in all its red-and-white-striped glory. Congratulations!
Bonus Quest Walkthrough
Wonka’s three biggest rivals have infiltrated the factory and absconded with his most important recipes! It’s your job to take to the skies and bring those recipes back!

In the glass elevator, you fly around the skies. Pick up the floating candy to re-fuel your elevator. Once it is full, click to release the candy to gum up the enemy planes’ engines. Do this three times and you’ll get the Heli-Gum item!
___________________________________________________________________________________________
Counterfiet Island Guide
Introduction
Take a ride in the Poptropica blimp and arrive at ”Counterfeit Island.” Head over to the Web Browser Cafe and you should see a big book on a table inside the cafe. Click on the book and you should get a loose page from it with some French vocabulary listed. You will also see a couple of computers that you can play a game on, if you want.
Now go back outside and next to the cafe you will find the Moldy Baguette Inn, which is the multiplayer room for this island. Next, get onto the roof and on one of the windowsills there should be a piece of paper. Pick this up and then hop back down to the ground. You need to collect six of these pieces of paper (Torn Picture in your inventory).

You will also see a man with a beard and paintbrush. If you click on “Create your own masterpiece”, it takes you to a big drawing pad. This doesn’t affect the game at all, though. Walk the other way over to the museum. Go up to the very top of the museum’s roof, where you should find and collect another piece of paper.

Balloon Boy
Go all the way to the right, where you will see a few mimes and a clown shop. The mimes aren’t really important at this time. If you go up to the roof of the clown shop you will see a clown, who will tell you he is up there because mimes give him the creeps. Inside the clown shop, you will see a girl to your right, who seems to work there.
Also, you can take one balloon from the clown store (tip - get the green one!). Keep going to the right, where you will pass by a dumpster and a tour of the underground tunnel. You’ll then come across some trashcans. Click on the second one and you will get a view of what it contains. Just drag all the trash out of the way until you find Underground Tunnel Tour Tickets.

Farther down to the right, past the Jazz Cafe and police station, you will see a young boy crying and his mother holding a red balloon. Talk to to the boy’s mom, who will say ”Mon fils veut un ballon vert!” Check your French vocabulary sheet, which explains that ”veut” means want and ”vert” meansgreen, so you can conclude that she is trying to inform you that her son wants a green balloon.
If you don’t have a green balloon already, then go back to the clown shop and get one. Give your green balloon to the boy and he will float away, while his mother will run off.

Head all the way left again until you’re back at the Web Browser Cafe. Enter the cafe. On the TV, there will be a new report about “Balloon Boy.”
Underground Tour
Talk to the tourist on the laptop. After speaking to him, go to your inventory and click on the ”Use” option on the tickets. He will then give you one of the tickets.

Exit the cafe, and walk to your right until you reach the underground tours. Click on the ”Use” option on your Underground Tunnel Tour Ticket to be allowed into the underground tour.
Click on the tour guide and she will provide you with some information about the tour. Just follow the tunnel untill you get to an area with some skulls. Jump onto the light cord that is hanging down and climb all the way up. Next, jump over and grab the piece of paper.

Once you reach the end of the tunnel you should go out the exit and up right by the docks.
Museum
A shady man in a brown suit with a scar will be standing next to you. Talk to him and he will tell you that you must get a job at the museum and to meet him back there when night falls. Also, he saysThe Scream is going to be stolen!

Climb up onto the docks and go right until you arrive at the museum. Enter and talk to the security guard by the door.
Fixing the Paintings
Choose the third chat option and he tells you to go speak with the assistant curator. Head up the stairs and speak to the man wearing a tan-colored suit. He tells you that the job is yours if you can help him fix the paintings. Go to the bottom right wing of the building and click the third painting. You should now be carrying the painting. Go to the bottom left wing and click the middle painting.

Now go up to the upper left wing and click the middle one. Next go to the upper right wing and click the third one. Finally go back to the bottom right wing and click where the third painting should be.
Forgery Detection Lab
Go back up and talk to the assistant currator, who will hire you for the job. Enter the forgery detection lab, and talk to the assistan currator again. He will tell you to choose a station. (Tip – The second station is usually easier, but you have to do both anyway.)
At the first station, scan each copy of the painting until you find the one with a drawing on it.

Next you have to detect the fake painting - simply examine the corner for the artist’s signatures. The middle one is different, so it is the counterfeit copy (fake). For the next one, just go up to the moon and click on it.
Time to move on to the chemicals station. For each paint sample, when the red meter gets to a box, the box turns a certain color. All you have to do is click the color above that it turns into. You must stay alert and react fast enough, or you will have to restart.

Once that is done, you will be given the Supply Room Key.

Leave the forgery detection lab and go to the area with two signs. You should now be in a statue room.
Sneaking Around
Walk right past this section and go into the next room. Pass by the security office for now. When you get to the door of the supply closet, go to your inventory and click on the ”Use” option on your new key. Now go in and take the piece of paper.

Exit the museum, and move left until you get to the dock and go all the way over to the ship. Up where the sail should be is another piece of paper you should take.

Now get back down to the tunnel exit from earlier. Go past the man up at the hill to receive the final piece of paper.

Speak to the man with a scar and go into the tunnel. Follow the tunnel back up until you see a ladder. Climb the ladder and click on the object blocking the exit at the top. Make the center look like the drawing you have, and press the button at the top.

It will now open up to the supply closet, inside the museum. Use the key to leave the supply closet, then carefully get past the security office and out the door. Be warned; there are lasers all around you. Hide behind plants or statues to avoid the lasers until you finally exit safely.

Walk over to where a painting titled The Scream is hanging. Click on the painting and you will jump up above it. An alarm siren will go off and policemen will rush in to arrest you.
The Next Morning
”The next morning,” you will find yourself at the police station, where you will be asked to take a lie detector test.

Talk to the girl nearby, who will instruct you to go to the security office at the museum. Once at the museum, head over to the security office - notice that the security guard is missing. Head over to the right to what looks like a computer. Click on it and a video should start playing.
After about 10 seconds, the video pauses. Exit the museum and visit the clown shop, where you will find the security guard from the museum. After talking to him, he will give you his Timecard.

After you get it, make your way back to the security office at the museum.
Screen Print & Scooter Chase
View the video again, but this time you will watch it from when the security guard left. You will be told to take a Surveillance Video Screen Print. To do this, press the print screen button. Show the screen print to the investigator.

Next, show the screen print to one of the mimes. The mime will signal to you, instructing you to enter the Jazz Cafe. Once inside the cafe you will see the man with a scar. Try to talk to him, and he will escape out the door. Follow him out to begin the thrilling scooter chase.

During the chase, dodge everything except the ramps. Going on a ramp can get you farther, and faster. After a while, it will cut to a scene where you see the man with a scar driving off the dock into a motor boat and speeding away. You will then dash over and grab the Key Card which he dropped on his way there.

Early Poptropica Island
Make your way back to the museum where the assistant curator will hand you a package containingVan Gogh’s Starry Night with a scanning device. Use the X-ray scan to read the message, which tells you to visit the art museum on Early Poptropica Island.

Ride the blimp on Main Street to Early Poptropica, and arrive at the Pop Art Museum, where you will meet the curator. She will hint that someone you trust is watching you very closely. The curator will also give you a Key.

The Scream
Take the blimp back to Counterfeit Island and go all the way to the right until you get to a cottage house. Walk up to the cottage door and use your key. Get up to the second floor, where the painting is.
You should see a corner of the painting peeling off, so click on that. The painting titled The Screamwill be revealed, and the lights will go out. Someone will tie you to a chair in an underground room. Then the Black Widow will talk to you for a minute.
The Black Widow
Untying from Chairs
Tied up near you in another chair is the man with a scar. He advises you to try and scoot over to him so he can untie you. To do this, move forward and backward, but be careful. If you fall over, you must restart. After he helps untie you, go to the right side where you should find the exit.
Escape
(Tip – Stay alert at all times; the next part is tough!) Go all the way to the left and jump up onto the boxes. Carefully jump up onto the ledge and onto the boxes without being seen. This may take a few tries.

Hop up to the right when the guard turns around; follow him and then jump onto the couch and up to the left ledge. Use your key card to open the door.
Saving Art & Lifting High
Now walk to the left where you will find the Black Widow. In this next tricky part, your task is to help the man with a scar be raised and lifted up high, yet save as much art as possible. If you let the Black Widow destroy more than 1 million dollars’ worth of art, you must start over. (Tip – Save the art, and then when she gets mad go and get him up as high as you can. Avoid the bombs she throws, which will prevent you from doing anything.)

Eventually you will get him all the way up, and the man will knock the Black Widow out.
Reward
You will then be in the Web Browser Cafe with the curator. She will tell you to meet her at the museum. Head over to the museum now and the curator will be waiting for you at the bottom right wing of the museum.
Talk to her and she will tell you that this museum really is the top secret storage place for the world’s greatest art. As she presses a nearby button, the walls will go down to reveal new paintings.
Congratulations, you have completed Counterfeit Island! You will be awarded with the Counterfeit Island Medallion and credits to spend at the Poptropica Store.
_______________________________________________________________________
Cryptids Island Guide!
Take a blimp ride to Cryptids Island, if you aren’t already there. You will arrive on Main Street. Walk right until you see a guy with a soccer ball, talk to him and he will hand you the flyer for the million dollar reward. (Brought to you by Harold Mews!) Go right until you get to a tree that looks like this:

Where the red circle is, there should be a five dollar bill in there. Grab it. Then go to the General Store, and click ‘Use’ on the $5.00. You will obtain Poptropica’s Favorite Sports Drink!

Go back to the street that’s all the way to the right. Take the drink to the gardener who is standing in front of all the mansions. Then he’ll say that he will take a break and walk away. You obtain the Shears! (Extra: You can use the shears on the lady’s bush. She’ll call her attorney though… xD)
Go all the way to the other side of the island, and find the girl in a hang glider. Give her a push. Now jump up to the person in a balloon seat. Cut the rope with your Gardening Shears. Get the extra Nylon Rope.
Now go to Kitty’s Kites on Main Street and click ‘Use’ on the Nylon Rope. You will be given the kite surfing kite. Go back to the park and go all the way to the edge. You will surf for a while and… lookie here… Gretchen. She’s like the updated Betty Jetty. She’ll throw fire balls at your kite, burning your connection to the kite, and you’ll sink. (Not my new kite!) Then the Mews-Coptor-5000 comes and saves the day! The last thing you see is that Mews helicopter, before you pass out.
You will wake up, lying down, in a room that looks like this:

Yay, you lived! Anyway, Mews will come tell you to meet in the foyer. (That’s right! He’s talking to YOU!) First, you have to drink the water that should be by your nightstand. Then go to the foyer. The inside should have a sign that says Welcome to the Cryptid Museum. Since Harold Mews is not there yet, check out all the videos. Then Mews will arrive. You’ll join the quest to find Cryptids! Yay! Go outside the mansion and go check out the private helicopter you can use:

Once your on your helicopter, go to Loch Ness. You can do these in any order, but I’m doing them in the easiest order.

Go right, to the Pub. Inside the pub, grab the matches and talk to the dude that looks like this:

Play a game of darts with him. After you win (don’t give up, you can win), he’ll give you a ticket for a ride on the rowboat, Lil’ Ness.

Go back left, and under the bridge, there should be a guy with a yellow jeep. Talk to him, and then click on his tire. Blow it out, and you will get a camera. Now go take a ride on the Lil’ Ness. Take a picture of the thing that looks like Nessie. Go back to the Mews mansion. Show him Nessie’s picture. You will find out it’s fake. Go back to Loch Ness, and talk to the liar. He will go away. Now, go back to the pub. Talk to the guys who are hanging out. You will play another game of darts, and the you will get the submarine ticket.

Take a picture of the Nessie that looks weird. Go to the Pub. Show them the picture. They will show a newspaper article. Oh! Looks like another fake. Sigh. Then you will have to play another darts game. The reward promised is a LIE!!! But the bartender, feeling bad for you, will give you a Penny Whistle. Go on the Lil’ Ness, and go left.

Go left again. Blow the whistle. And…. NESSIE!!! (Doesn’t it look CUTE?) Take a picture, and go to the Mews Mansion! The Nessie case will be confirmed. Now go back to your helicopter, and go to the Himalayas.

Once you arrive at the Himalayas, go up a bit, until you see the Sherpa guy with stuff on his back. He looks like this:

Climb the mountain with him, and when the wind is blowing strong, just try anyway. Tie yourself slowly. You will arrive with the monks. Go inside the building, and talk to the monk at the far right corner. They won’t let you take Bigfoot evidence, but they will give you a lantern. Make sure you light it. Then go outside, and climb a little bit up. Talk to the monk that looks like this:

You will play a quick game, which is actually very simple. Just don’t get trapped. Then he will let you pass. Go up and there will be a foot in the snow. Take a picture of it.

Go back to the Mews mansion. Sigh. It’s just a snowshoe footprint. Now you can go to New Jersey.

When you arrive, jump on top of the gas station. Cut the girl free using your gardening shears. Then, jump on this sweet ride:

You will need the “Bathroom Door Message” for instructions on where to go. Next to the motorbike is a dumpster. You can cut open the lock with bolt cutters, which you can get from Puerto Rico [a helicopter location] by riding the jeep to the farthest farm. There should be bolt cutters you can pick up at the very top of a rock.
When you get back to New Jersey and unlock the dumpster, pulling out a bathroom door, you will need to enter the building just next to it and match it with the other door. Your character will then copy down the completed message. Otherwise, you can just use this for your reference:

Follow these instructions, and you will finally come to a small clearing like this* (*= see below picture), look around there and find a house.

In the house, go to the attic. You will hear something, and it will turn out to be a racoon. Next to the racoon, there should be a grappling hook. Get it. On your way down, you should see a thing. Could it be… the Jersey Devil?! Go outside, and the Jersey Devil will fly away. Use your grappling hook. Climb up to here:

Get the egg. Now go back left. Get on your helicopter, and head to Puerto Rico.

Talk to the farmer. He will give you seeds to take to his brother, and lend you his jeep. Get on the jeep and go North, to the top right hand corner star. Give the other farmer the seeds, and go left, to grab the fur. Go back to the main farm, and go to the Mews mansion. Use the sample fur, and followeverything in the exact order. It’s just coyote fur. Sigh. Now use the egg! Another confirmed case! Go back to Puerto Rico, and go to the jeep. Now, herd three brown-with-white-spotted goats to the middle star.

Land there. Nothing will happen. Go find the main farm guide. He will help you. Hide next to the boulders. You will hear a THUMP! Go move the box. Suddenly, it will shake and open, and out will pop the… CHUPACABRA!!! It will growl at you, and run away, and leave you in the ground with stars circling your head. Go where the Chupacabra was, and grab its tooth. Head back to the Mews mansion, and confirmed! But, wait! You still have to find Bigfoot!
Mews will tell you that Bigfoot has been spotted in the Pacific Northwest. It has been installed in the helicopter. Go to your helicopter, and go to the Pacific Northwest.

When you arrive, Bigfoot will be running around. Follow him for a while, and then Mews will send you a message. But Gretchen will listen in on it. She will capture Bigfoot. Now you have to stop Gretchen. Jump on her helicopter. Let all the fuel out. Now use your gardening shears. You and Bigfoot will float down to safety! Yay! You and Mews will talk, and then you will get your medallion and credits to spend at the Poptropica Store! Congrats!

_____________________________________________________________________________________________
Dr.Hare's Secret Lab Guide
Note: You must get “Dr. Hare’s Secret Lab” from the Poptropica Store to play this quest.
The quests begins! Jump up onto the rocks and ledges until you reach a metal-looking-ish thing with a Rabbot sign above it (that sign never stops scaring me) and a box of carrots on a rock near it (Not again!) Enter the building. Then you will appear in another metal looking room. Why all the metal, Dr. Hare. Just wondering. It makes your hideout standout. Get it? …Um ok yea moving on…
Go right over a floating platform to the right, near an ad for membership (very nice, Dr. Hare. Ads. I love it.) Then you will come across a man with a pink eyepatch (not very manly sailor) pink lab coat (still not manly) and clipboard. Talk to him. He will tell you that you are in one of Dr. Hare’s secret lairs, he was a mind-slave of Dr. Hare, and that he made a very creepy looking robot to the right which will help him with evil plans. Again with the evil plans. Why not good plans? Why? Click on the robot cage to your right. You then say that you need three colored cards. Go back on the sliding-down thingy and go right once at the bottom. Click on the red Dr. Hare door.
Go right after the stupid annoying little laser like thing and get on the floating thing with a box. Then, let it pull you up until you’ve reached a platform with a red button at the end of it. Push the box onto the red thing. The blocked door above will open. Now, to get to the upper platform, go left and hide behind the carrot boxes from the guards (creepy looking right?) Then jump up, jump right, and get the red key card.
Now, go left above the bearded guard, and hop onto yet another floating platform with a box. When you come across another flooring, push the box onto it because it has the purple (purple is the best color in the world, just saying) button. Then go back on the floating platform and ride it up to the other platform with bearded guard on it, hide behind a box, and then jump up onto the now unlocked room with the purple card. (Purple is still awesome.)
Now, go down down down. Below the entrance. Below the thing with more lasers. And ride another platform down where you have to hide behind another box from a weird person with an afro. A little farther over from you it the blue card slot. Now, ride the platform up again above the thing with lasers, and go to the edge. There should be a box at the end. Push the box off the end and it will smash on the ground near/on the blue switch. Push it onto it if it isn’t already on it. If you push it off the end like I did the first time, you’re dead and you need to start over. Now if it is on it, yaeeeey for you and run over on top of the other platforms with the lasers, onto the moving platform, into the room with the blue card, then you grab the blue card, scream with joy, ride the floating platform back up again, go out through the entrance… you get the main idea.
Rush up to the top where the robot is, open it up with your cards, and–WHAT?! Only 50 credits?! And also, you get a robot costume to Customize your character! :P It was fun indeed!
____________________________________________________________________________________________
Early Poptropica Guide!
First, go to Early Poptropica Island (if you are not already on it). You should be on Main Street. (Remember that if you’re not sure where you are, you can check your Map!) Go all the way to the right until you come across a sign that says “Early Poptropica”. Click on the sign to go there. Go right again and you should arrive at Early Poptropica.
Go to the right where you should pass by 3 very pixellated-looking men. Talk to the third one you see. He will say that his pig was stolen by a sneaky spider. Next, keep going to the right again until you see another pixellated man by a well. Talk to him, and he will tell you that someone stole their bucket.
Now next to the man you just spoke to, there should be a rope. Climb it, and when you reach the top you should see another pixellated man. Talk to him and he will tell you that they lost their flag.
The Glow Stick
Go back to the man who lost a bucket. Next to him is a well. Go down the well.

Then go down the rope you are on. You should arrive in the Storage Cavern. Move a little to the left, and jump downward, to the left side. (To do this, move the cursor to the lower-left corner and click.)
You should arrive onto a green platform. Now jump to another green platform on the top left side of the platform you are on. Move a bit to the left, then jump to the brown platform located on the left side of the platform you are currently standing on.
Climb up the rope on the brown platform, then jump onto another brown platform located to the right of the rope you are holding. Now jump up to the platform above you. You should see a glow stick. Walk over to it to get it!

You should have gotten a Glow Stick. Now exit the Storage Cavern. If you don’t know how, just follow the same steps above that showed you how to reach the glow stick, but backward!
Prized Porker
Now go back to Main Street. Go left until you see a manhole on the ground next to the Soda Pop Shop. Click on the manhole to go down.

You should be clinging onto a rope. Climb all the way down to get inside the pit. Once inside, jump down to the left where there should be a woman wearing a skull shirt.
Go past her and jump on the platform there. On the right there should be a moving platform. Jump onto it when it gets close. Watch out for the little purple spiders hanging above you! If you touch them you will get knocked over. At the end of the ride, jump down to another platform. Then on that platform, there should be another platform next to it – jump onto that.
From there jump onto the platform you see on your right. Now jump to the platform on the left, then onto the platform to the left of the one you are standing on. That platform should have a rope below it. Climb down that rope. Now wait for a moving platform to get near, then jump on it!
At the end of the ride you should see a pixellated pig. Jump down and grab it. You should obtain thePrized Porker. Beware of the huge spider guarding the pig, because it will knock you over if you bump into it! Now stay where you are and follow the next set of instructions!
Golden Egg
You should still be in the pit, where you’d just grabbed the pig. From the bottom of the pit (where the pig was), go all the way to the left until you reach the end. Click on the end to “Go Left.” You should appear in a tunnel. Go left again. Now you should be in a dark place.
You can only see by using your Glow Stick. Start at the place that says ‘Darkness Awaits.’

Now go all the way to the left until you see the first rope. Climb up the rope until you reach a place where you have to go either left or right.
Now go right until you pass by 2 ropes. Climb the second rope, which you should reach at a dead end. After you climb the rope, go left until you see another rope, and climb that rope. The words on the wall will say ‘Getting Warmer.’
Once you are up that rope, go left until you see a huge Golden Egg. Walk over it to take it.

Go right now, past the Getting Warmer sign and go climb the rope. Go left and climb the first rope you see. Go left again, and there will be a rope going down. Just get through it, and wait for the rope past that. Now, after you have climbed it, go right, and you will find a rope that leads up. Go up and you’ll be at the Poptropica Towers.
Reaching the Skies
You should be at Poptropica Towers. Now run all the way to the left until you see a brown building.
Jump up on the first window ledge of that building, then the second, then the third and stop at the fourth window ledge. From the fourth window ledge, jump up, but to the left side.
You should land on a stone statue. From the statue, jump to the roof of a red building on the left. On the roof of the red building, jump to the left side, where you should now find yourself on the window ledge of a blue building.
Keep jumping up onto the window ledges above you and stop when you reach the blue building’s roof, which looks like a mini-restaurant. Between the 2 tables should be a vine. Go up the vine!
Water Bucket
Climb up the vine again, and now you should be in the skies. (Note: The Map labels this place as “The Purple Giant.”) Go all the way to the right until you see a huge pair of feet.
Click on them to talk to the giant. You will give him the Golden Egg and he will lift up his spiky weapon and let you pass.

Now go right. Go to the right again, and you should now be in the Giant’s Garden. There should be a gardening tool in front of you. Walk on it as if it were a ramp and you should soon be doing the same to a vine.
Now jump off of the vine, and you should land on some gigantic vegetables. Jump off of the vegetables and pick up the pixellated-looking bucket on the ground. You should acquire a Water Bucket.
Signal Flag
Now go to the right. Go right again and you should arrive in the Aircraft Graveyard. Jump onto the cans in front of you, then jump again onto the brown aircraft.
From there, jump onto the red and white aircraft. Now jump off the white and red aircraft, and grab theJet Pack on the yellow table. You can wear this item! When wearing it, you can fly. This item can only be worn on Early Poptropica Island.
Now put on the jet pack and go left, back to the Giant’s Garden. Stand on the shovel and fly over it to reach the hole in the clouds marked ‘Exit,’ and go down.

You’ll land on top of the water tower on Main Street, and behold… a pixellated flag! Fly over to it to grab the Signal Flag.

Now go back to Early Poptropica.
Returning the Items
Go back to the pixellated man who said his pig was stolen. Talk to him, and the item “Prized Porker” will be removed from your inventory, and the man’s pig will be returned.
Now go to the pixellated man by the well. Talk to him, and the item “Water Bucket” will be removed from your inventory, and the well’s bucket will be returned. Now go to the pixellated man who said the Early Poptropicans’ flag was lost.
Talk to him, and the item “Signal Flag” will be removed from your inventory, and the flag will be returned to the flagpole next to the man.
Claiming Your Reward
You’ve earned it. Now go get it. Climb down the rope near the man with the flag, and go right. There should be a boat at the very right with another pixellated person.
Talk to the person on the boat, and he will reward you with a medallion! You can wear the medallion by going to your Early Poptropica Inventory and selecting the “Island Medallion” card, and clicking on “Put On.” You will also rewarded with credits! Congratz! Completed the guide
No comments:
Post a Comment